
Text, as a unique communication tool for humans, has accompanied the entire history of human development. It can be said without exaggeration that without text, humans could not have achieved today’s technological achievements. Therefore, humans have always been pursuing to improve the security in the process of information exchange - from the stock market to war to daily communication, various encryption methods and means have emerged endlessly.
If you still don’t get the importance of information encryption, please see the story below…
A Story About Drinking
The Beginning of the Story
To understand the relationship between various terms, we have to start with a drink story. Suppose today A wants to call B out for a drink, let’s look at the most primitive situation:

Everything seems so simple, direct, and efficient, until a new role joins, who is B's wife:

The situation suddenly became serious. Because “B’s wife” eavesdropped on the process of A and B passing information and heard about B is going to drink tonight, she decisively took action and thwarted this "underground" transaction.
The Struggle
Academically, we call A and B’s communication is experiencing a man-in-the-middle (MITM) attack. To counter this attack method, A and B thought of a method: if both parties agree on a code in advance, we only need to “encrypt” what we want to say according to the code and send it out to ensure the privacy of the message, right? So the situation became like this:

The problem seems to have been perfectly solved - until B’s wife found out the code encryption method agreed by A and B while cleaning…
So, A and B’s communication became “unencrypted” again - the drink activite was not successful again.
As the saying goes, blessings never come in pairs, and misfortunes never come singly. With the requirement of epidemic isolation (COVID-19), it has become a problem for A and B to meet, and it is even more impossible for both parties to achieve a new agreement of the encryption code privately. If A and B argue encryption code online, the situation will return to the beginning of the story - in the case of MITM attack, this exchange seems meaningless.
The Continuation of the Struggle
In the above situation, we call the code agreed by A and B a key. A encrypts data through the key, and B decrypts data through the same key - we call this method symmetric encryption. From the above principle, it can be concluded that under the premise of sufficient encryption algorithm strength, the security of the key is the security of the entire encryption process. Once the key is leaked, the process of information exchange will no longer be secure.
Unfortunately, it is impossible for the two parties exchanging information in the Internet environment to agree on the key offline, and the online method is easy to suffer from man-in-the-middle attacks. Therefore, how to safely exchange keys under non-secure conditions has become an urgent problem to be solved.
So is there any algorithm that can ensure that the middleman cannot decrypt the data even if he gets the ciphertext and the key? The answer is: Yes! Asymmetric encryption can achieve the above requirements.
The general theoretical basis of asymmetric encryption algorithm is some mathematical problems (such as the common elliptic curve algorithm, etc.). Here is a simple example: we all know that 102=100, but if this operation is “reversed”, that is, to solve lg100=?, it will be more difficult, and the required calculation amount is not a level.
Asymmetric encryption algorithms usually generate a pair of public and private keys. You can understand the public key in the text as 100, and the private key can be understood as 2 in the text. I can tell the other party the base number (10) and the result (100), but because lg100=? is a mathematical “problem” that is "difficult" to solve, as long as we ensure that the private key 2 is not leaked, then the result of the entire algorithm is safe.
Asymmetric encryption has a characteristic: data encrypted with a public key can only be decrypted with a private key, and vice versa. This is like a key can only open a lock, but the lock itself cannot open the lock. The underlying principle of this involves complex mathematical proofs, but you don’t need to pay attention to these details, because there are already many ready-made asymmetric algorithms for us to use.
OK, after talking so much, it’s actually to solve the problem of A and B drinking requirement. Because data encrypted with a public key can only be decrypted with a private key, so if you only get the ciphertext and the public key, you can’t restore the original text. Therefore, B only needs to encrypt the symmetric encryption key that he wants to agree on with the public key and then send it to A to complete the “safe exchange of keys under non-secure conditions”, right?
First, A gives his public key to B. After B receives the public key, he uses the public key to encrypt the symmetric key in the previous section. This is like putting the key used for symmetric encryption into a box, and then using the private key, which is only hold by A, to lock the box:

In this way, even if the locked box is intercepted by B’s wife, she still can’t open the box without the private key (please go out for the classmate who says to pry open!).
After A receives the box sent by B, he uses the private key to open the box and obtains the symmetric encryption key. Then it’s the routine in the second section again. AB uses the agreed symmetric encryption key to communicate.

It seems that A and B can happily drink together again…right?
The Art of Deception
Originally, A and B thought they could finally loudly conspire to drink. At this time, B’s wife smiled slightly and said, you know nothing about power:

B’s wife continues to use man-in-the-middle hijacking technology, first obtains A’s public key (black lock), and then tells B another public key (red lock). After that, B encrypts the symmetric key with the public key (red lock) and replies to his own wife. At this time, B’s wife has obtained the symmetric key to be used in this communication process, and then uses the public key (black lock) obtained from A before to encrypt the symmetric key again and reply to A.
Note that during the whole process, the key locked in the box is still B’s key, but this key has lost its privacy (intercepted by B’s wife).
After that, the story returned to the beginning of the article again. Because B’s wife mastered the symmetric encryption key, she can decrypt the entire A, B call process.
B’s wife can even impersonate the other party to reply:

At this time, the ball was kicked to A, B’s feet again…
Prove You Are Yourself
In fact, apart from acting as a middleman to forward A and B’s messages, B’s wife can also directly impersonate A to deceive B:

In the above picture, B’s wife impersonates A to send a message to B. B mistakenly thinks that this message is really sent by A, so he gives a positive reply according to the normal process.
- B said afterwards: Your personal appearance…is a foul…
- B’s wife said: Are you itching again?
At this moment, A and B have two more problems to solve:
- How to prevent messages from being tampered with?
- How to prevent identity from being forged?
Let’s look at the first one first.
I don’t know if you have seen the operation of the court sealing property and putting seals on some doors, windows, boxes and other objects, or the operation of sealing letters with fire paint when transmitting letters in ancient times. These two examples are essentially using some additional means to corroborate the content again.
So is there such a method in the communication process that can achieve the means of corroborating information? The answer is still: Yes! This answer is to perform a hash algorithm (digest algorithm) on the message itself once, and the common hash algorithms are md5, sha1, sha256, etc.
Due to the characteristics of the hash algorithm itself, even if the message has a change of 1 bit, the value after the hash will become completely different. If the hash value of this message is attached when transmitting the message, the receiver only needs to redo the hash of the message text with the same algorithm, and then compare the hash value calculated by himself with the hash value passed over to know whether the message has been tampered with.
The value obtained by performing a hash algorithm on the entire message text is generally called the signature of the message. This value has uniqueness and can be used to prove whether the message itself has been tampered with.
In practice, we usually encrypt the value after the message hash with the private key once again, and the person who receives the message can just decrypt it with the corresponding public key, so it can further confirm that the message is indeed sent by the “person” who holds the private key.
When it comes to this, I don’t know if you can think of any loopholes? Yes, since I know there is a signature mechanism, then I can do a signature again for the tampered message…
This involves the second problem above - how to prevent identity from being forged?
Leaving aside all technical details, let’s first think about a scene:
- There is a contract with XXX’s name and XXX’s ID number
- Someone holds XXX’s ID card, and the photo on the ID card looks like this “someone”
So can we conclude that “someone” must be one of the signatories of this contract? The answer is obviously yes, because this is how we operate in our daily life.
Actually, there is an implicit condition here - the ID card. We all consider that the ID card is an authoritative piece of information that can be used to verify the truth and prove the falsehood. The ID card is issued by the state - that is, you and I both choose to believe in an authoritative third party.
In the above example, the “ID card” can be considered as a certificate, and the state is the authoritative institution (CA) that issues this certificate, and the ID number is the CA’s signature for a person. If we want to verify whether someone is really the holder of an ID card, we only need to ask the CA with the ID number, and then compare the name, photo and other information returned by the CA with the ID card held by “someone”, this process can be called signature verification.
If in the communication between A and B, B first verifies A’s identity, and then checks A’s declared message signature value, then we can say that this message must be sent by A (the premise is that A’s private key cannot be leaked).
At this point, the concept of a certificate comes out: a certificate is a file that contains the certification information of an object by an authoritative third-party institution and the signature of this certification information.
Final Version
OK, after introducing the concepts of CA and certificates, let’s take a look at the final version of this story:

In the new story, what A sends to B will no longer be a public key, but a certificate, the composition of the certificate is as follows:

When B receives A’s certificate, he will first see if the CA is a CA he trusts. If it is a CA he trusts, he will calculate the hash value 1 of the blue part in the picture above, and then use the CA’s public key to decrypt the signature information to get the hash value 2, and finally compare the hash value 1 and 2. If the two values are equal, it proves that the data has not been tampered with.
At this point, B has completed the entire verification process. And at this point, B only needs to extract the public key in the certificate from A, and complete the subsequent encryption process to ensure the security of the entire session data transmission.
In this case, because B’s wife cannot impersonate A’s identity to apply for a certificate from the CA (the CA theoretically will verify the identity of the applicant), she cannot use the man-in-the-middle hijacking method to obtain the private key information transmitted during the negotiation phase of the entire session process.
Summary
As you can see, all these protective measures we have taken are for the purpose of ensuring that the final transmission of the symmetric encryption key is not stolen. And the certificate mentioned in the above text (containing the public key, the signature of the third-party certified file), is just to solve the original demand of “safely exchanging keys under non-secure conditions”.
At this point, I think you have a preliminary understanding of the relationship between symmetric encryption, asymmetric encryption, hash, signature, and certificate.
Next, let’s take a look at a few practical applications.
Application of Certificates in the Real World
Signing https Websites
First, let’s take a look at what a certificate looks like, using the https certificate of this site as an example:

You can see that the certificate mainly shows three parts:
- Issued to whom
- Who issued it
- Validity period
If there is no problem with the certificate, there will generally be a lock symbol in the address bar of the browser. Browsers like Chrome will even use more eye-catching green to remind you that the site is safe. So, how does the browser determine that the site is safe? This requires looking at the certificate chain of this certificate:

The above picture is the certificate chain of this site’s certificate. You can see that the certificate called ISRG Root X1 is at the top position. This certificate issued R3, and then R3 issued the certificate of this site.
So how does the browser determine that this site is safe?
Take IE as an example, in its Internet Options -> Content -> Certificates tab, we can see the ISRG Root X1 certificate under the “Trusted Root Certification Authorities” tab. It is precisely because this certificate is trusted that the websites it certifies are also trusted by the browser:

When writing this article, the browser on one of my computers happened to warn “Not a private connection”, let’s take a look at the certificate chain in this case:

It turns out that the root certificate DST Root CA X3 on this machine has expired, and this certificate is no longer trusted by the browser, so the browser issued the above warning.
At this point, you may have two questions:
- Who issued the root certificate at the top?
- Where do these root certificates come from?
The answer is:
- The root certificate is self-issued, because the root certificate issuing institution is recognized by everyone from the perspective of strength
- These trusted root certificates are generally built into the operating system or browser
More Certificate Details
First, let’s take a look at all the details of this site’s certificate:
- hacksign@XSignLaptop [17:28:45] : ~/Work
- >> openssl s_client -connect debugwar.com:443 -servername debugwar.com < /dev/null | sed -ne '/-BEGIN CERTIFICATE-/,/-END CERTIFICATE-/p' > debugwar.crt
- depth=2 C = US, O = Internet Security Research Group, CN = ISRG Root X1
- verify return:1
- depth=1 C = US, O = Let's Encrypt, CN = R3
- verify return:1
- depth=0 CN = debugwar.com
- verify return:1
- DONE
- hacksign@XSignLaptop [17:28:45] : ~/Work
- >> openssl x509 -in debugwar.crt -text -noout
- Certificate:
- Data:
- Version: 3 (0x2)
- Serial Number:
- 03:aa:4b:8b:74:af:65:a6:89:9c:b9:cc:46:9b:1b:43:0c:6f
- Signature Algorithm: sha256WithRSAEncryption
- Issuer: C = US, O = Let's Encrypt, CN = R3
- Validity
- Not Before: Oct 23 07:40:48 2021 GMT
- Not After : Jan 21 07:40:47 2022 GMT
- Subject: CN = debugwar.com
- Subject Public Key Info:
- Public Key Algorithm: rsaEncryption
- RSA Public-Key: (2048 bit)
- Modulus:
- 00:e1:db:4f:66:e1:e6:8d:f3:1e:31:df:47:9e:d2:
- e2:04:de:f2:80:f3:5c:56:8c:8d:1a:a4:62:f9:44:
- 69:02:7e:20:69:f2:6f:d1:cf:25:3a:ca:6f:25:9a:
- dc:7a:ca:2b:d7:05:55:ad:71:ee:ab:08:dc:58:a9:
- e4:e2:27:8c:25:1c:8c:60:ed:97:6e:c5:69:95:dd:
- 99:14:3b:5f:07:a6:36:d5:00:fd:f0:ac:7c:e4:69:
- 0e:d0:f2:41:73:28:d2:01:b3:8b:38:68:8a:20:ce:
- 2f:e4:5e:90:56:e6:0c:8f:5f:44:4a:7a:64:ee:d4:
- 19:ca:76:09:08:64:a3:cb:ce:67:e5:2e:dd:2e:8e:
- 9e:e0:60:68:65:e0:68:68:02:13:db:78:b7:f8:ed:
- 4c:d6:79:01:ce:7b:6e:4d:f8:34:b3:b9:a7:54:86:
- 02:ef:a2:1e:a6:f8:f6:a7:ae:5a:84:a1:6a:22:3f:
- 7b:db:1e:13:91:16:2f:19:03:8a:c6:35:49:c4:69:
- 6d:6a:1c:1b:f1:3d:01:3c:2f:0c:81:d2:8c:fb:67:
- c6:90:aa:1c:d2:78:16:0b:a8:0d:a9:98:52:d4:97:
- 33:26:ed:48:6a:af:a1:4c:99:f2:07:31:c3:8e:fd:
- 98:b5:ba:ab:59:0e:bb:f0:58:fb:3f:fa:71:7d:46:
- ea:63
- Exponent: 65537 (0x10001)
- X509v3 extensions:
- X509v3 Key Usage: critical
- Digital Signature, Key Encipherment
- X509v3 Extended Key Usage:
- TLS Web Server Authentication, TLS Web Client Authentication
- X509v3 Basic Constraints: critical
- CA:FALSE
- X509v3 Subject Key Identifier:
- 80:99:14:55:B5:FB:47:D9:FD:6E:1C:07:C7:DA:65:3C:EB:65:BD:5E
- X509v3 Authority Key Identifier:
- keyid:14:2E:B3:17:B7:58:56:CB:AE:50:09:40:E6:1F:AF:9D:8B:14:C2:C6
- Authority Information Access:
- OCSP - URI:http://r3.o.lencr.org
- CA Issuers - URI:http://r3.i.lencr.org/
- X509v3 Subject Alternative Name:
-  DNS:*.debugwar.com, DNS:debugwar.com
- X509v3 Certificate Policies:
- Policy: 2.23.140.1.2.1
- Policy: 1.3.6.1.4.1.44947.1.1.1
- CPS: http://cps.letsencrypt.org
- CT Precertificate SCTs:
- Signed Certificate Timestamp:
- Version : v1 (0x0)
- Log ID : DF:A5:5E:AB:68:82:4F:1F:6C:AD:EE:B8:5F:4E:3E:5A:
- EA:CD:A2:12:A4:6A:5E:8E:3B:12:C0:20:44:5C:2A:73
- Timestamp : Oct 23 08:40:48.764 2021 GMT
- Extensions: none
- Signature : ecdsa-with-SHA256
- 30:44:02:20:1B:B1:81:FF:FE:2E:56:62:31:B8:EA:CE:
- 6C:10:8A:13:6F:A2:BB:62:B8:EF:0F:CB:DE:F5:B6:26:
- A9:18:9D:20:02:20:57:A7:B5:7D:15:C6:30:41:B1:C7:
- DB:EA:3F:88:99:91:F5:F0:22:47:0D:DC:47:82:6C:32:
- BE:5C:E2:D4:E1:3C
- Signed Certificate Timestamp:
- Version : v1 (0x0)
- Log ID : 29:79:BE:F0:9E:39:39:21:F0:56:73:9F:63:A5:77:E5:
- BE:57:7D:9C:60:0A:F8:F9:4D:5D:26:5C:25:5D:C7:84
- Timestamp : Oct 23 08:40:48.752 2021 GMT
- Extensions: none
- Signature : ecdsa-with-SHA256
- 30:45:02:21:00:C9:7B:C2:41:3A:FE:57:A3:75:E1:30:
- 2B:E8:EC:A0:BD:65:8E:D4:77:41:D1:21:63:A7:63:70:
- CB:8A:B5:6F:85:02:20:45:D5:FB:99:EE:F4:5C:43:10:
- 4D:DA:9D:DF:C0:61:FD:61:B1:3B:8C:5A:C6:24:FE:24:
- DA:61:BA:1A:4D:20:9A
- Signature Algorithm: sha256WithRSAEncryption
- 62:c8:ba:69:15:7a:f4:eb:8a:32:f2:95:15:b5:6e:cf:fa:46:
- 7a:b2:6e:4b:bf:97:c3:52:b6:da:dc:c5:ca:ad:6b:8c:05:7b:
- fd:d3:c4:4b:f4:09:1a:e2:89:d5:8d:16:64:99:87:e0:8d:d6:
- ec:82:36:51:08:bc:23:6e:c7:ef:04:2c:61:22:e5:af:67:7e:
- 40:08:50:c7:9f:94:dc:e6:6e:b9:70:7c:f2:60:67:b6:4b:d7:
- 4d:84:04:40:21:fa:c7:9f:94:64:e7:6b:17:b8:b9:df:da:7d:
- d3:8c:b8:5a:29:3a:80:48:ba:11:ac:91:b9:38:9f:3b:05:49:
- c0:8a:7d:80:60:10:07:81:c7:af:47:97:f9:5d:2b:d5:c7:f1:
- 78:bd:b6:ee:55:b6:f7:f1:e0:2e:f2:73:54:8d:06:d9:e6:97:
- 6e:fb:b1:b6:fa:92:ec:dc:8b:2d:4f:1d:d7:09:ac:07:e8:dc:
- 58:ea:c0:a9:06:ee:e9:eb:af:a8:f3:79:21:44:b3:08:7b:51:
- 8d:86:df:c2:e9:cd:12:0c:5b:7f:89:58:cd:9d:c5:d7:9f:d8:
- cd:97:f5:55:86:5e:f1:3f:09:40:d7:eb:a5:ae:8b:2e:b3:16:
- 9e:e1:26:28:fc:61:cc:7a:3d:49:8b:0e:a1:b6:59:cb:42:49:
- fa:5c:08:4a
Next, I will pick a few useful fields to explain.
First are the following fields:
- Issuer: C = US, O = Let's Encrypt, CN = R3
- Validity
- Not Before: Oct 23 07:40:48 2021 GMT
- Not After : Jan 21 07:40:47 2022 GMT
- Subject: CN = debugwar.com
- Subject Public Key Info:
- Public Key Algorithm: rsaEncryption
- RSA Public-Key: (2048 bit)
- Modulus:
- 00:e1:db:4f:66:e1:e6:8d:f3:1e:31:df:47:9e:d2:
- ………………
- X509v3 extensions:
- X509v3 Subject Alternative Name:
- DNS:*.debugwar.com, DNS:debugwar.com
- Signature Algorithm: sha256WithRSAEncryption
- ………………
Issuer:indicates who issued this certificate
Validity:indicates the valid start and end date of this certificate
Subject:indicates who this certificate is issued to, CN is the abbreviation of Common Name, which is the address of this website
Subject Public Key Info: the public key of the website and some algorithm information used by the public key
X509v3 extensions: This field is some extension information, among which the more important one is X509v3 Subject Alternative Name, abbreviated as SAN. We often see that some websites use blog.xxx.com and other forms to distinguish different sections of the website. In this case, each subdomain needs to sign a certificate with the corresponding Subject’s CN value separately, which is obviously unreasonable. So in the SAN field, we can use *.xxx.com to indicate that all secondary subdomains can use this certificate.
Signature Algorithm:the signature field mentioned in the above text, which can be used to verify whether this certificate has been tampered with
http/https/ssl/tls protocols
When it comes to https protocol, we have to talk about http protocol and ssl/tls protocol.
First, let’s popularize two knowledge points that everyone may know:
- The http protocol is a 4-layer protocol
- The http protocol transmits content in plaintext
Maybe everyone knows this, but they don’t know what it is actually used for in practical application.
Next, we can intuitively feel the following picture:

The http protocol is a 4-layer protocol
The green part on the left side of the above picture is the individual data packets captured by wireshark for this IP address of Baidu. The white part in the middle is a detailed structure analysis of the 771-frame data packet. The black part on the right is the command in the command line to request the Baidu homepage of the http protocol.
From the white part in the middle, you can see that Hypertext Transfer Protocol is successively: Transmission Control Protocol, Internet Protocol Version 4, Ethernet II. These are the famous Http protocol, TCP protocol, IP protocol, Ethernet protocol, etc., which correspond to the application layer, transport layer, network layer, and internet interface layer of the network model in the figure below

Here is an extra digression, do you still remember the high-frequency interview question: Please briefly describe the three handshakes and four waves of TCP. This actually corresponds to frames 766, 769, 770 and 777, 780, 781, 782 in the above wireshark screenshot.
BasicAuth Authentication
The address format we commonly see in our daily life
It’s not actually a complete format. In the URI character definition of the http protocol, we can actually specify the username and password for the purpose of verification. This verification method is called BasicAuth. When accessing a website that has enabled BasicAuth in the browser, you will see the following dialog box:

From the above wireshark screenshot, we can also see that if the website of the http protocol is accessed, the username and password of BasicAuth are transmitted in plaintext, which means that other people can see the username and password during the transmission.
ssl/tls/https protocol
Since http plaintext transmission is not safe, how can we ensure the security of our data? This is the purpose of the https protocol.
In fact, fundamentally speaking, the https protocol just uses the ssl or tls protocol to encrypt the data before http starts transmitting data, and what it transmits is still “plaintext” data, but because the data has been encrypted in advance, it no longer has readability.
First, let’s take a look at the process of the https protocol:

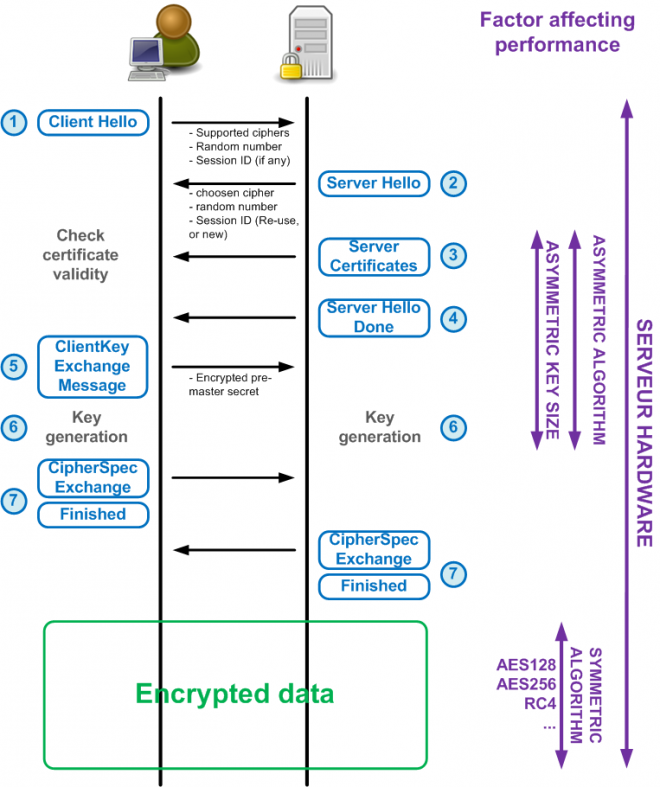
ClientHello: The Client sends its own TLS protocol version, encryption suite, compression method, random number, SessionID (not filled) to the Server
ServerHello: The Server sends the selected SSL protocol version, compression algorithm, password suite, filled SessionID, generated random number and other information to the Client
ServerCertificates: The Server sends its own digital certificate (containing the public key) to the Client. (The certificate needs to be applied from the Digital Certificate Certification Authority (CA), the certificate is a certification for the server), if you want to conduct more secure data communication, the Server can also send a Cerficate Request to the Client to ask the client to send the other party’s certificate for legality Authentication.
ServerHelloDone: After completing ServerHello, the Server will send a Server Hello Done message to the Client, indicating that ServerHello is over.
ClientKeyExchage: When the client receives the server’s certificate and other information, it first checks the server’s certificate for integrity and whether the certificate matches the server’s domain. Then, it generates a PreMaster Secret using an encryption algorithm, encrypts it with the server’s public key, and sends it to the server.
ClientFinishd: The client sends a ChangeCipherSpec (a protocol with only one byte of data) to inform the server that it has switched to the previously negotiated encryption suite state and is ready to use the previously negotiated encryption suite to encrypt data and transmit it. Then, it uses the Master Secret (calculated from two random numbers, the PreMaster Secret, and the encryption algorithm) to encrypt a piece of Finish data and send it to the server. This data is used to verify the encryption and decryption channel established during the handshake before the formal transmission of application data.
Server Finishd: After receiving the encrypted data sent by the client, the server uses its private key to decrypt this data and verify it. Then, it sends a ChangeCipherSpec to the client, informing the client that it has switched to the negotiated encryption suite state and is ready to use the encryption suite to encrypt data and transmit it. Afterward, the server also uses the Master Secret to encrypt a piece of Finish message and send it to the client to verify whether the encryption and decryption channel established through the handshake was successful.
Just looking at the text is too dry, let’s observe the entire communication packets in Wireshark:

First and last, it’s still the three-way handshake and four-way wave-off of 28-30 and 56-61.
Then, after ClientHello (31, 33) and ServerHello (34, 35), the client and server exchanged the negotiated algorithm through Client Key Exchange (36, 37) and Change Cipher Spec (38, 39).
The last two Application Data (40-43) are requests and responses, theoretically, the username and password should exist in the 40th packet, but now the data has been encrypted, so the data we see is “meaningless”.
A special reminder is that in the above interaction process, almost every packet appears in pairs, each packet is followed by an ACK packet - remember the content of the TCP protocol… reliable transmission, the ACK packet is the guarantee of reliability.
Two-way authentication
In fact, the HTTPS protocol in the previous section is still a simplified version. The complete HTTPS protocol supports two-way authentication, that is, the client not only needs to authenticate the server, but the server also needs to authenticate the client.
But usually, everyone visits websites that are open for business - all who come are guests. Therefore, the server will not verify the identity of the client.
But in some special scenarios, two-way authentication is needed. This section will use nginx as an example to configure a two-way authentication server. The result is that if a browser without a specified private key wants to visit the website running on nginx, it will directly report an error.
Let’s first have an intuitive feel for the final result.
First is the access without a private key:

Then we import a specific private key into the browser.

Then visit the site again:

At this time, the site will ask us to provide a certificate. If we provide the correct certificate, we can get all the content of the site:

The above is a manual demonstration of the entire authentication process. In fact, we can automatically complete the above authentication process through the configuration of nginx. Authentication access is completed through two nginx instances.
In the following text, we will call one of the nginx instances the Client side and the other the Server side. The Client side is used to simulate the browser’s access to the server in the manual process above, and the Server side is running our actual site.
First is the nginx configuration as the Client side, this configuration will authenticate the certificate sent by the server side and the identity of the server side, to prevent someone from hijacking the server side and impersonating the server side:
- upstream backend.dynamic-domain.com {
- jdomain backend.dynamic-domain.com port=1203 interval=10;
- }
- server {
- listen 443 ssl;
- ssl_certificate /path/to/certificate/issued/by/letsencrypt/website.crt;
- ssl_certificate_key /path/to/certificate/issued/by/letsencrypt/website.key;
- proxy_ssl_verify on;
- proxy_ssl_trusted_certificate /path/to/self/signed/certificate/ca.crt;
- proxy_ssl_certificate /path/to/self/signed/certificate/client.crt;
- proxy_ssl_certificate_key /path/to/self/signed/certificate/client.key;
- location = / {
- proxy_pass https://backend.dynamic-domain.com;
- }
- location / {
- proxy_pass https://backend.dynamic-domain.com;
- }
- }
Lines 7 and 8 are the site’s certificates, this certificate is a normal website certificate, applied from let’s encrypt, because the certificate signed by let’s encrypt can be trusted by major browsers, so when other people visit the website, the browser will prompt for safety.
Lines 10 to 13 open nginx’s ssl verification for the server side, where ca.crt is a privately signed root certificate. Because this certificate is privately signed, other people’s certificates obtained through any institution are not trusted, only the sub-certificates signed by this private root certificate are considered legal.
Lines 12 and 13 are the client sub-certificate and key file signed by ca.crt respectively, client.crt is used to show the server side its own identity, the server side also configures to trust the sub-certificate signed by the private ca.crt root certificate.
Below is the server side configuration file, this configuration will verify the client’s identity and send its own certificate to the client (whether to verify depends on the client):
- server {
- listen 443 ssl;
- ssl_verify_client on;
- ssl_certificate /path/to/self/signed/certificate/server.crt;
- ssl_certificate_key /path/to/self/signed/certificate/server.key;
- ssl_client_certificate /path/to/self/signed/certificate/ca.crt;
- location / {
- proxy_pass http://192.168.1.100:1203;
- }
- }
Line 3 above turns on the switch to verify the client.
Line 6 is the same ca.crt root certificate as in the client side configuration, declaring that only the sub-certificates signed by this certificate are considered legal.
Lines 4 and 5 are the server sub-certificate and key file signed by the private root certificate respectively, server.crt is the certificate sent to the client for verification.
Because the client and server sides both trust the ca.crt root certificate, the client.crt and server.crt signed by ca.crt are considered legal in both sides’ view and can interact normally.
If you have understood the logic of the above two-way authentication, the next step is to generate the following three certificates:
- ca.crt、ca.key: root certificate and key file
- client.crt、client.key:client sub-certificate signed by ca.crt
- server.crt、server.key:server sub-certificate signed by ca.crt
Note: Because it is a self-signed certificate, ca.crt is self-issued. If you use any public third-party certificate issuing organization as your own root certificate, in the case of improper configuration, others can access data without authorization.
Generate certificate
In the above text, we used 3 certificates, and 3 corresponding private keys, let’s go step by step below.
In general, generating a certificate is divided into three major steps:
- Generate private key
- Generate CSR request file
- Generate certificate
Generate private root certificate
The root certificate is used to sign the next client and server certificates.
In other words, the root certificate is the parent certificate of the client and server certificates, and the client and server are brother certificates. In our two-way authentication nginx above, brothers trust their common parent certificate. Because the parent certificate is self-signed by us, as long as the private key of the parent certificate is not leaked, it can ensure the privacy of communication between the entire system.
First, we generate the private key file:
- openssl genrsa -aes256 -out rootca.key.pem 4096

Then generate the CSR certificate request:
- openssl req -new -key rootca.key.pem -out rootca.csr.pem

Here you will be asked to enter the password you entered when creating rootca.key.pem in the first step.
Also note, the Common Name item, this item is used to identify the user, the website’s certificate is used to identify the website, if this item does not match the actual domain name visited, the browser will prompt for risk.
Generate self-signed certificate
- openssl x509 -req -in rootca.csr.pem -signkey rootca.key.pem -out rootca.crt.pem

Note:
- The -signkey parameter is used to generate a self-signed certificate, and the client and server certificates are not used because of this parameter.
- If you refer to other documents, you may find that they use the openssl ca command, this command needs to be used with the configuration file, this article avoids introducing too complex concepts, use the openssl x509 command to generate the root certificate, this can avoid using the configuration file.
You can observe the root certificate just generated through the command, and find that both its issuer and subject are yourself:

Below we will take the generation of the client certificate as an example, the command to generate the server certificate is the same, the following points need to be noted:
- Use different keys and output file names (of course, you can also use the same key, but this will lose some security)
- When generating CSR, Common Name should fill in the corresponding identification information
Generate private key
- openssl genrsa -out client.key.pem 4096
Generate csr
- openssl req -new -key client.key.pem -out client.csr.pem
Note, Common Name should fill in the corresponding identification, in other words, the identification of the root certificate, client certificate, server certificate should be different:

Generate certificate:
- openssl x509 -req -in client.csr.pem -out client.crt.pem -CA rootca.crt.pem -CAkey rootca.key.pem -CAcreateserial -CAserial ./serial.txt
Use the command to observe the signing status, you can find that the issuer is a private CA, and the subject is a certificate with a client identifier:

Ending
This article talks about the relationship between symmetric encryption, asymmetric encryption, certificates, and signatures, and shows a two-way verification of the HTTPS protocol usage scenario that is not common in actual application processes.
Hope to be helpful to everyone ;)